Preparation for using OpenGL in Visual Studio
投稿日: Invalid Date
更新日: 2024/07/02
In this lesson, we intend to provide easy-to-understand explanations even for those who are touching OpenGL for the first time. The target audience is those who have some experience with C language at a basic level.
I am using OpenGL 2.1, but I plan to make it easy to apply to newer versions of OpenGL such as OpenGL 3.x and OpenGL 4.x, without relying too much on outdated features.
The reason for explaining with OpenGL 2.1 is that there are many computers that do not support newer versions of OpenGL. If you want the software you create to be used by many people when you publish it, you often have to use older versions of OpenGL in such cases.
For example, the famous illustration software Clip Studio uses OpenGL 2.1, and it can be assumed that other software such as Live2D uses OpenGL 3.3. In this way, even commercial software uses older versions of OpenGL intentionally.
I use C++ as the language, but I will try to avoid using C++ specific features as much as possible. Even if I do use them, I will explain them each time, so please don't worry. C++ has some difficult aspects, but it is very useful with features like dynamic arrays.
OpenGL maintains compatibility between versions, which can sometimes make it very complicated and challenging to learn due to the numerous differences.
I hope that I can resolve those aspects. I am still immature, but I believe in writing for someone's benefit, so thank you for your support.
Installation of Visual Studio
The version can be either 2013, 2015, or 2017. For those who have already installed it, please proceed to the next step.
If you do not have Visual Studio installed on your computer, please follow the instructions in this article to install it.
Initial settings related to OpenGL
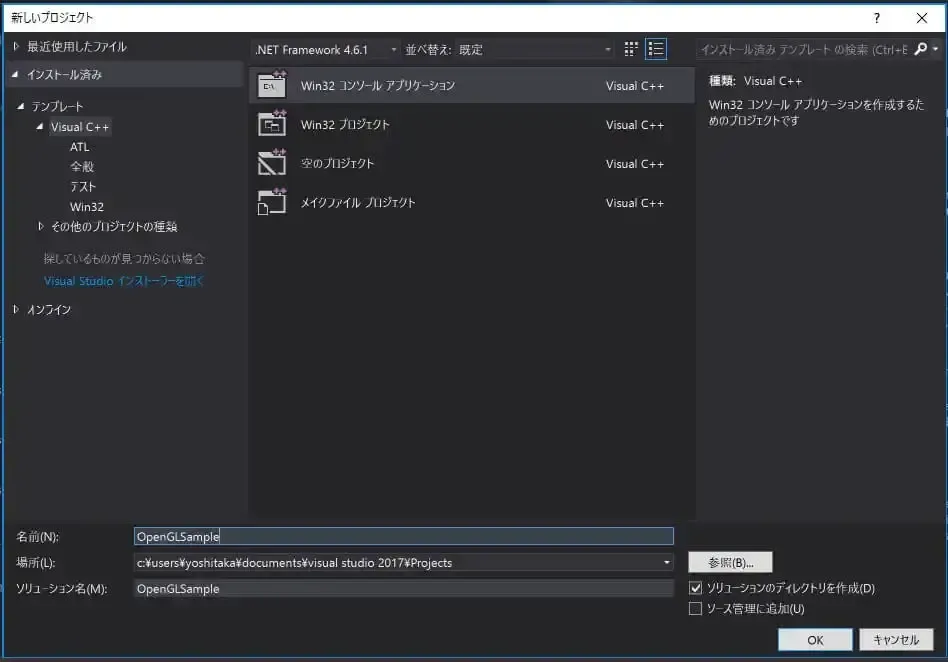
Start Visual Studio, go to File -> New -> Project, and choose Visual C++ Console Application.
Please come up with a suitable project name.

Press "complete" to complete.
Go to the project → Navigate to NuGet Package Manager and click on References, then search for "nupengl".

When you select nupengl.core, an install button will appear, so please proceed with the installation. This will allow you to use libraries such as GLFW, GLEW, FreeGLUT, and others.
NuGet automatically handles tasks such as "downloading files from the site, installing, and setting up paths" for you. It's so convenient that it seems too good to be true...
I will briefly explain here, but OpenGL only includes core functions for CG rendering. In other words, for example, when creating a game using OpenGL, you need to use other libraries to play music or to generate windows for drawing CG on operating systems like Windows or MacOS.
The libraries that will generate a window for you are GLUT, FreeGLUT, and GLFW. You can use one of them. GLUT was created by the same people who made OpenGL, but it is no longer being maintained. FreeGLUT is the successor library to GLUT. Additionally, there are other libraries such as wxWidgets and Qt, but they are too large in scope for learning OpenGL.
GLEW is for extending the functionality of OpenGL, and there are similar libraries such as Gle. I think it provides functions that are not supported depending on the version of OpenGL.
Next, we will install the glm library. glm is a highly convenient matrix-related library for OpenGL, and there is no reason not to use it. Install it in the same way.

Important If you don't do this, none of the OpenGL functions will work.
Go to Project → Project Property → Configuration Property → Linker → Input → Add additional dependencies and press "Edit", then type in "opengl32.lib" and press OK.

OpenGL itself is included in the Windows OS, so this is all you need. There is no need to download it separately.
Basic settings are now complete.
If I hadn't used NuGet, I think the explanation would have been much longer. NuGet is too good.
Table of Contents
